Pocket Style Templates
Since Project Mouse has come out, SO many people have asked me if sell pocket style templates. I've considered it, but I feel like there are so many people who already sell digital Pocket Style templates, that it wouldn't be something original for me to create and sell. I'd basically just be copying someone else's ideas in a sense. So my answer is no, I don't sell them. BUT I know lots of great places to get them.
Krista Sahlin wrote a PERFECT article on her blog with lots of great links to buy templates, digital plastic page protectors and even links to a couple fun freebies. This is a must-read article for those looking for pocket style templates.
Digital Page Protectors
When I started doing pocket style I was trying to decide if I wanted to do all my pages with the plastic digital page protectors that many designers have been releasing. I bought a set from Valorie Wibbens and started to play around with them.
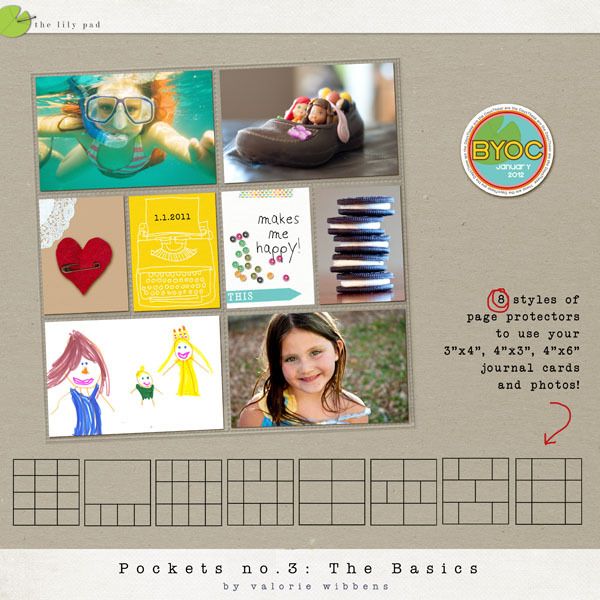
Unfortunately, this set of page protectors doesn't come with the template layers underneath. You can buy them separately, but I decided to save my money and make my own template underneath.
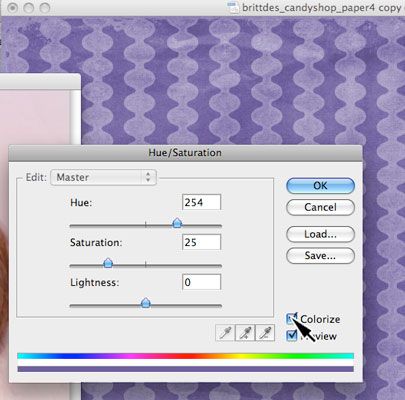
I learned that the page protectors definitely look cute, but they sort of give you a grey "filmy" look.
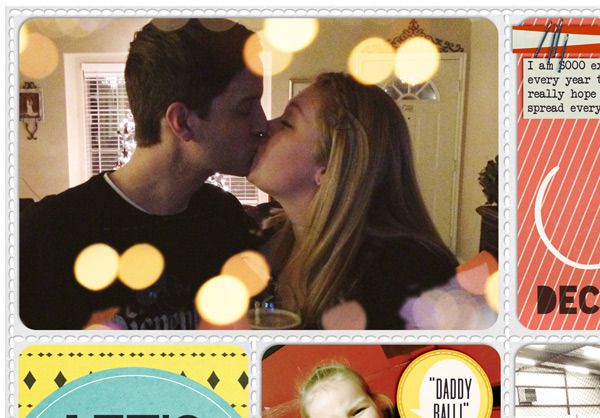
This is a close up of one of my weekly journal pages with NO page protector:

And here it is with the page protector laid on top, as the very top layer.
I know some people dig this look but its not for me. I like my photos, papers & other embellishments to look bright, crisp and clear. So . . . what to, what to do . . .
Turning down the opacity level on the page protector seemed to work a little. But then I was loosing the look of the pockets. A couple gals from Sahlin Studio CT taught me to just laying things ON TOP of page protectors - so put the page protector at the very bottom of all the layers. Then you still get the cute look of the page protectors borders and dividing lines, but keep all your crisp layering. It actually looks very cute this way. Here's the same close up as above, just with the page protector moved to the bottom layer.
Much cuter than I would have expected! So simple, just moving it to the bottom.
Another trick I discovered is:
* Duplicate the page protector layer (command + J on a mac or Layer > Duplicate Layer > click OK)
* Then put one page protector on the very bottom of all the layers and the other on the VERY top.
* Change the blending mode of the TOP page protector to "Hard Light".
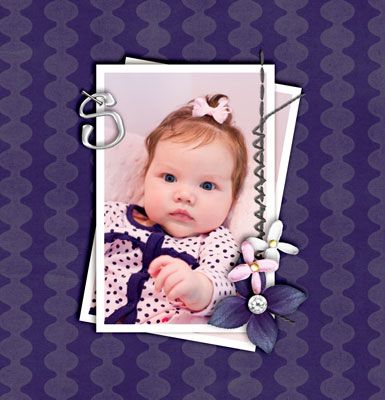
This is the result:

You still get a slightly plastic pocket look over the top, and those same cute dividing plastic pocket borders.
While I am happy with this last "hard light" method, in the end I've decided that I won't be using page protectors in most of my pocket style scrapping for 3 reasons:
1) I like the freedom to create ANY configuration of "pockets" that works for that page and not be limited to the page protectors pre-designed pocket arrangements.
2) I also like a little freedom to let tags and things overlap a tiny bit. When using a digital page protector I felt like I HAD to keep everything inside the pockets. (I know, duh that's what pocket style is all about, but I like a little bit more freedom.)
3) I think that if I did an ENTIRE album with page protectors I would get sick of looking at those little pockets and borders page after page after page once the book was done and printed. I still like the page protectors to use on a random everyday scrapbook page. But for my 2 "album" projects (Project Mouse and Weekly Journaling) I think it would start to look repetitive and annoying after 100+ pages!
Here's an everyday layout I did using the same Valorie Wibbens page protector and my "hard light" method.
(click image to enlarge)

[CREDITS HERE]
LOVE the pocket look like this!! SO CUTE. I still don't think I want an entire book of this, but on an occasional page here and there - yes, please!
*DISCLAIMER! THESE ARE JUST PERSONAL PREFERENCES!!!* If you LOVE an entire album full of digital page protectors, AWESOME!! Send me a link to your book and maybe I'll see the light. Like I keep saying - I'm totally in an experimental phase with Pocket Style digi-scrapping. Learning as I go!
Do you use digital page protectors? Which ones are your favorites? Do you have any other tricks I haven't discovered?
Hope you're all coming along with your Project Mouse and other pocket style digi-scrap pages. I'd remind you that we have a Project Mouse Flickr Group where you can come browse Project Mouse layouts and add your own too!! I love seeing all the LOs there. And they don't have to pocket style! ANY LO using Project Mouse is welcome!! Happy scrapping.

Since Project Mouse has come out, SO many people have asked me if sell pocket style templates. I've considered it, but I feel like there are so many people who already sell digital Pocket Style templates, that it wouldn't be something original for me to create and sell. I'd basically just be copying someone else's ideas in a sense. So my answer is no, I don't sell them. BUT I know lots of great places to get them.
Krista Sahlin wrote a PERFECT article on her blog with lots of great links to buy templates, digital plastic page protectors and even links to a couple fun freebies. This is a must-read article for those looking for pocket style templates.
Digital Page Protectors
When I started doing pocket style I was trying to decide if I wanted to do all my pages with the plastic digital page protectors that many designers have been releasing. I bought a set from Valorie Wibbens and started to play around with them.
Unfortunately, this set of page protectors doesn't come with the template layers underneath. You can buy them separately, but I decided to save my money and make my own template underneath.
I learned that the page protectors definitely look cute, but they sort of give you a grey "filmy" look.
This is a close up of one of my weekly journal pages with NO page protector:
And here it is with the page protector laid on top, as the very top layer.
I know some people dig this look but its not for me. I like my photos, papers & other embellishments to look bright, crisp and clear. So . . . what to, what to do . . .
Turning down the opacity level on the page protector seemed to work a little. But then I was loosing the look of the pockets. A couple gals from Sahlin Studio CT taught me to just laying things ON TOP of page protectors - so put the page protector at the very bottom of all the layers. Then you still get the cute look of the page protectors borders and dividing lines, but keep all your crisp layering. It actually looks very cute this way. Here's the same close up as above, just with the page protector moved to the bottom layer.
Much cuter than I would have expected! So simple, just moving it to the bottom.
Another trick I discovered is:
* Duplicate the page protector layer (command + J on a mac or Layer > Duplicate Layer > click OK)
* Then put one page protector on the very bottom of all the layers and the other on the VERY top.
* Change the blending mode of the TOP page protector to "Hard Light".
This is the result:
You still get a slightly plastic pocket look over the top, and those same cute dividing plastic pocket borders.
While I am happy with this last "hard light" method, in the end I've decided that I won't be using page protectors in most of my pocket style scrapping for 3 reasons:
1) I like the freedom to create ANY configuration of "pockets" that works for that page and not be limited to the page protectors pre-designed pocket arrangements.
2) I also like a little freedom to let tags and things overlap a tiny bit. When using a digital page protector I felt like I HAD to keep everything inside the pockets. (I know, duh that's what pocket style is all about, but I like a little bit more freedom.)
3) I think that if I did an ENTIRE album with page protectors I would get sick of looking at those little pockets and borders page after page after page once the book was done and printed. I still like the page protectors to use on a random everyday scrapbook page. But for my 2 "album" projects (Project Mouse and Weekly Journaling) I think it would start to look repetitive and annoying after 100+ pages!
Here's an everyday layout I did using the same Valorie Wibbens page protector and my "hard light" method.
[CREDITS HERE]
LOVE the pocket look like this!! SO CUTE. I still don't think I want an entire book of this, but on an occasional page here and there - yes, please!
*DISCLAIMER! THESE ARE JUST PERSONAL PREFERENCES!!!* If you LOVE an entire album full of digital page protectors, AWESOME!! Send me a link to your book and maybe I'll see the light. Like I keep saying - I'm totally in an experimental phase with Pocket Style digi-scrapping. Learning as I go!
Do you use digital page protectors? Which ones are your favorites? Do you have any other tricks I haven't discovered?
Hope you're all coming along with your Project Mouse and other pocket style digi-scrap pages. I'd remind you that we have a Project Mouse Flickr Group where you can come browse Project Mouse layouts and add your own too!! I love seeing all the LOs there. And they don't have to pocket style! ANY LO using Project Mouse is welcome!! Happy scrapping.